简介
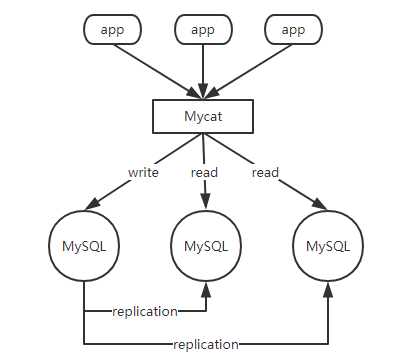
Mycat 是 MySQL中间件,Mycat的原理中最重要的一个动词就是'拦截',它拦截了用户发送过来的SQL语句,首先对SQL语句做了一些特定的分析:如分片分析、路由分析、读写分离分析、缓存分析等,然后将此SQL发往后端的真实数据库,并将返回的结果做适当的处理,最终再返回给用户。
强烈推荐阅读官方PDF,中文版下载地址:http://www.mycat.io/document/mycat-definitive-guide.pdf
Mycat 可以对mysql进行分片路由,我这里数据还没到达数据需要分片的量级,所以这里只说读写分离。
之前使用mysql的中间件是 amoeba, 日常使用中,经常出现突然异常,表现为:端口正常,但是无法路由到后端mysql,因此前端程序出现大量的无法连接数据库的报错,因此准备切换到 mycat ,后续继续爬坑。
mycat读写分离配置
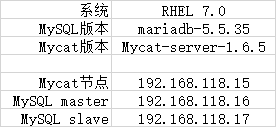
基本信息
1. 安装MySQL
以下操作在MySQL 两个节点上执行:
[root@192.168.118.16 ~]#yum install mariadb-server mysql -y
[root@192.168.118.16 ~]#systemctl start mariadb ; systemctl enable mariadb
2. 配置mysql主从复制
(推荐查看下mysql GTID方式的主从配置)
主从配置不再赘述,具体请参考:https://www.cnblogs.com/hukey/p/5912874.html
这里在主mysql中创建 sbtest库,并且创建该库所有权的用户,该用户必须能够查看到 show slave status 主从同步状态,因为后面 mycat 监控主从状态需要使用到。
[root@192.168.118.16 ~]#mysql
Welcome to the MariaDB monitor.  Commands end with ; or g.
Your MariaDB connection id is 9
Server version: 5.5.35-MariaDB-log MariaDB Server

Copyright (c) 2000, 2013, Oracle, Monty Program Ab and others.

Type 'help;' or 'h' for help. Type 'c' to clear the current input statement.

MariaDB [(none)]> create database sbtest;  # 创建库
Query OK, 1 row affected (0.00 sec)

MariaDB [(none)]> show databases;
+--------------------+
| Database           |
+--------------------+
| information_schema |
| mysql              |
| performance_schema |
| sbtest             |
| test               |
+--------------------+
5 rows in set (0.00 sec)
MariaDB [(none)]> grant all privileges on sbtest.* to 'sbtest'@'%' identified by 'sbtest' with grant option;  # 添加所有权的用户
Query OK, 0 rows affected (0.01 sec)

MariaDB [(none)]> flush privileges;
Query OK, 0 rows affected (0.00 sec)

MariaDB [(none)]> grant replication client on *.* to sbtest;  # 设置可以查看复制权限,这里一定要设定,否则后面配置mycat监控主从时,会报错。
Query OK, 0 rows affected (0.00 sec)
3. 配置mycat
(所有软件包官网都可以下载到)
首先安装 jdk
[root@192.168.118.15 /usr/local/src/mycat_tools]#tar xf jdk-8u77-linux-x64.tar.gz -C /usr/local/
[root@192.168.118.15 /usr/local/src/mycat_tools]#vim /etc/profile

# jdk
JAVA_HOME=/usr/local/jdk1.8.0_77
JAVA_BIN=$JAVA_HOME/bin
PATH=$PATH:$JAVA_BIN
CLASSPATH=$JAVA_HOME/lib/dt.jar:$JAVA_HOME/lib/tools.jar
export JAVA_HOME JAVA_BIN PATH CLASSPATH
# --------------
[root@192.168.118.15 /usr/local/src/mycat_tools]#. /etc/profile
修改mycat配置:
mycat中主要有两个配置文件:
[root@192.168.118.15 /usr/local/src/mycat_tools]#tar xf Mycat-server-1.6.5-release-20180122220033-linux.tar.gz -C /usr/local/
[root@192.168.118.15 /usr/local/src/mycat_tools]#cd /usr/local/mycat/conf/
[root@192.168.118.15 /usr/local/mycat/conf]#vim schema.xml
  1 <?xml version="1.0"?>
  2 <!DOCTYPE mycat:schema SYSTEM "schema.dtd">
  3 <mycat:schema xmlns:mycat="http://io.mycat/">
  4
  5         <schema name="sbtest" checkSQLschema="false" sqlMaxLimit="100" dataNode="sbtest">
  6         </schema>
  7         <dataNode name="sbtest" dataHost="sbtest" database="sbtest" />
  8         <dataHost name="sbtest" maxCon="1000" minCon="10" balance="1"
  9                           writeType="0" dbType="mysql" dbDriver="native" switchType="2"  slaveThreshold="100">
 10                 <heartbeat>show slave status</heartbeat>
 11                 <!-- can have multi write hosts -->
 12                 <writeHost host="hostM1" url="192.168.118.16:3306" user="sbtest"
 13                                    password="sbtest">
 14                         <!-- can have multi read hosts -->
 15                         <readHost host="hostS2" url="192.168.118.17:3306" user="sbtest" password="sbtest" />
 16                 </writeHost>
 17         </dataHost>
 18 </mycat:schema>
在上面的配置中,特别要注意标黄的部分:
balance
balance="1"
负载均衡类型,目前的取值有 3 种:
- balance="0", 不开启读写分离机制,所有读操作都发送到当前可用的 writeHost 上。
- balance="1",全部的 readHost 与 stand by writeHost 参与 select 语句的负载均衡,简单的说,当双主双从模式(M1->S1,M2->S2,并且 M1 与 M2 互为主备),正常情况下,M2,S1,S2 都参与 select 语句的负载均衡。
- balance="2",所有读操作都随机的在 writeHost、readhost 上分发。
- balance="3",所有读请求随机的分发到 wiriterHost 对应的 readhost 执行,writerHost 不负担读压力,注意 balance=3 只在 1.4 及其以后版本有,1.3 没有。
这里只有将 balance 设置为 1 才开启读写分离。
switchType
switchType="2"
- switchType="1" 默认值,自动切换
- switchType="2" 基于 MySQL 主从同步的状态决定是否切换 心跳语句为 show slave status
- switchType="3" 基于 MySQL galary cluster 的切换机制(适合集群)(1.4.1)心跳语句为 show status like ‘wsrep%’
如果mycat通过查看 show slave status 查看主从down掉或者超过设置的 slaveThreshold 时,说明这时的数据同步不准确或者无法访问从节点
switchType="1" 时,mycat不会出现任何切换,读请求依然路由到从节点,无法访问最新的数据;
switchType="2" 时,mycat会自动剔除从节点,因为这时的从节点无法保证和主节点的一致性,读写都会路由到主节点保证数据的准确。
其他具体参数参考:https://www.processon.com/view/5bfd0f54e4b00684ca0bed1f 写成树形图更能清晰查看。
修改 server.xml 为逻辑添加用户和规则
[root@192.168.118.15 /usr/local/mycat/conf]#vim server.xml
        # 修改如下
        <firewall>
           <whitehost>
              <host host="*" user="sbtest"/>    # 可以限制指定的ip访问
           </whitehost>
       <blacklist check="true">
           <property  name ="selectAllColumnAllow">false</property>    # 禁止 select * 访问数据库
       </blacklist>
        </firewall>
        ...

        <user name="sbtest">
                <property name="password">sbtest</property>
                <property name="schemas">sbtest</property>
                <!--<property name="readOnly">true</property> -->
        </user>
在 firewall 规则里,可以限定 ip 和 具体规则, 这里做了禁止 select * 的操作,有些程序员写的SQL真的很令人费解,其他具体的限定规则,请参考上面分享的官网 PDF
启动服务
[root@192.168.118.15 /usr/local/mycat/conf]#/usr/local/mycat/bin/mycat start
Starting Mycat-server...
[root@192.168.118.15 /usr/local/mycat/conf]#netstat -ntplu | egrep "8066|9066"
tcp        0      0 0.0.0.0:8066            0.0.0.0:*               LISTEN      11023/java
tcp        0      0 0.0.0.0:9066            0.0.0.0:*               LISTEN      11023/java

8066: mycat服务端口
9066: mycat管理端口
到此,mycat读写分离已经配置完毕。
[root@192.168.118.15 /usr/local/mycat/logs]#ls
mycat.log  mycat.pid  wrapper.log

# wrapper.log mycat启动日志,启动报错查看该日志
# mycat.log mycat运行日志
性能测试
MySQL主节点:
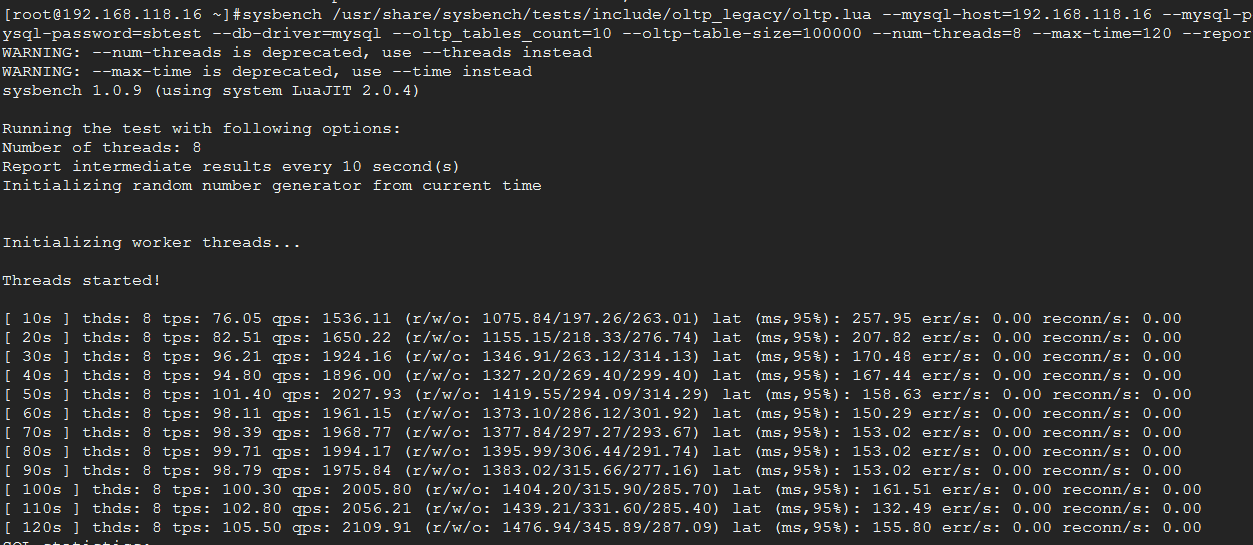
[root@192.168.118.16 ~]#yum install sysbench -y    # 需要配置 epel源
# 添加测试数据 创建10张表,每张表里10万条数据
[root@192.168.118.16 ~]#sysbench /usr/share/sysbench/tests/include/oltp_legacy/oltp.lua --mysql-host=192.168.118.16 --mysql-port=3306 --mysql-user=sbtest --mysql-password=sbtest --db-driver=mysql --oltp_tables_count=10 --oltp-table-size=100000 --rand-init=on prepare

# 开始测试
[root@192.168.118.16 ~]#sysbench /usr/share/sysbench/tests/include/oltp_legacy/oltp.lua --mysql-host=192.168.118.16 --mysql-port=3306 --mysql-user=sbtest --mysql-password=sbtest --db-driver=mysql --oltp_tables_count=10 --oltp-table-size=100000 --num-threads=8 --max-time=120 --report-interval=10 --rand-init=on run
每次测试完毕,记得清理数据
[root@192.168.118.16 ~]#sysbench /usr/share/sysbench/tests/include/oltp_legacy/oltp.lua --mysql-host=192.168.118.16 --mysql-port=3306 --mysql-user=sbtest --mysql-password=sbtest --db-driver=mysql --oltp_tables_count=10 --oltp-table-size=100000 --num-threads=8 --max-time=120 --report-interval=10 --rand-init=on cleanup
mycat 节点
[root@192.168.118.15 ~]#yum install sysbench -y    # 需要配置 epel源
# 添加测试数据 创建10张表,每张表里10万条数据
[root@192.168.118.15 ~]#sysbench /usr/share/sysbench/tests/include/oltp_legacy/oltp.lua --mysql-host=192.168.118.15 --mysql-port=8066 --mysql-user=sbtest --mysql-password=sbtest --db-driver=mysql --oltp_tables_count=10 --oltp-table-size=100000 --rand-init=on prepare

# 开始测试
[root@192.168.118.15 ~]#sysbench /usr/share/sysbench/tests/include/oltp_legacy/oltp.lua --mysql-host=192.168.118.15 --mysql-port=8066 --mysql-user=sbtest --mysql-password=sbtest --db-driver=mysql --oltp_tables_count=10 --oltp-table-size=100000 --num-threads=8 --max-time=120 --report-interval=10 --rand-init=on run

清除数据
[root@192.168.118.15 ~]#sysbench /usr/share/sysbench/tests/include/oltp_legacy/oltp.lua --mysql-host=192.168.118.15 --mysql-port=8066 --mysql-user=sbtest --mysql-password=sbtest --db-driver=mysql --oltp_tables_count=10 --oltp-table-size=100000 --num-threads=8 --max-time=120 --report-interval=10 --rand-init=on cleanup
通过简单的对比,mycat对性能的消耗很小。这只是个简单的例子,如果要求准确性,最少得30分钟以上的测试数据。
Mycat-web 的安装使用
安装步骤:
- 安装 zookeeper 并启动服务
- 安装 mycat-web 并启动服务
安装 zookeeper 并启动服务
[root@192.168.118.15 /usr/local/src/mycat_tools]#tar xf zookeeper-3.4.6.tar.gz -C /usr/local/
[root@192.168.118.15 /usr/local/src/mycat_tools]#cd /usr/local/zookeeper-3.4.6/conf/
[root@192.168.118.15 /usr/local/zookeeper-3.4.6/conf]#mv zoo_sample.cfg zoo.cfg
[root@192.168.118.15 /usr/local/zookeeper-3.4.6/bin]#./zkServer.sh start
JMX enabled by default
Using config: /usr/local/zookeeper-3.4.6/bin/../conf/zoo.cfg
Starting zookeeper ... STARTED
[root@192.168.118.15 /usr/local/zookeeper-3.4.6/bin]#netstat -ntplu | egrep 2181  # zookeeper 默认端口2181,启动成功
tcp        0      0 0.0.0.0:2181            0.0.0.0:*               LISTEN      12661/java
安装 mycat-web 并启动服务
[root@192.168.118.15 /usr/local/src/mycat_tools]#tar xf Mycat-web-1.0-SNAPSHOT-20170102153329-linux.tar.gz -C /usr/local/
[root@192.168.118.15 /usr/local/src/mycat_tools]#cd /usr/local/mycat-web/
[root@192.168.118.15 /usr/local/mycat-web]#nohup sh start.sh &  # 启动日志可以直接查看 nohup.out
[root@192.168.118.15 /usr/local/mycat-web]#netstat -ntplu | egrep 8082  # mycat-web默认端口8082
tcp        0      0 0.0.0.0:8082            0.0.0.0:*               LISTEN      12695/java
现在就可以通过浏览器直接访问 mycat-web

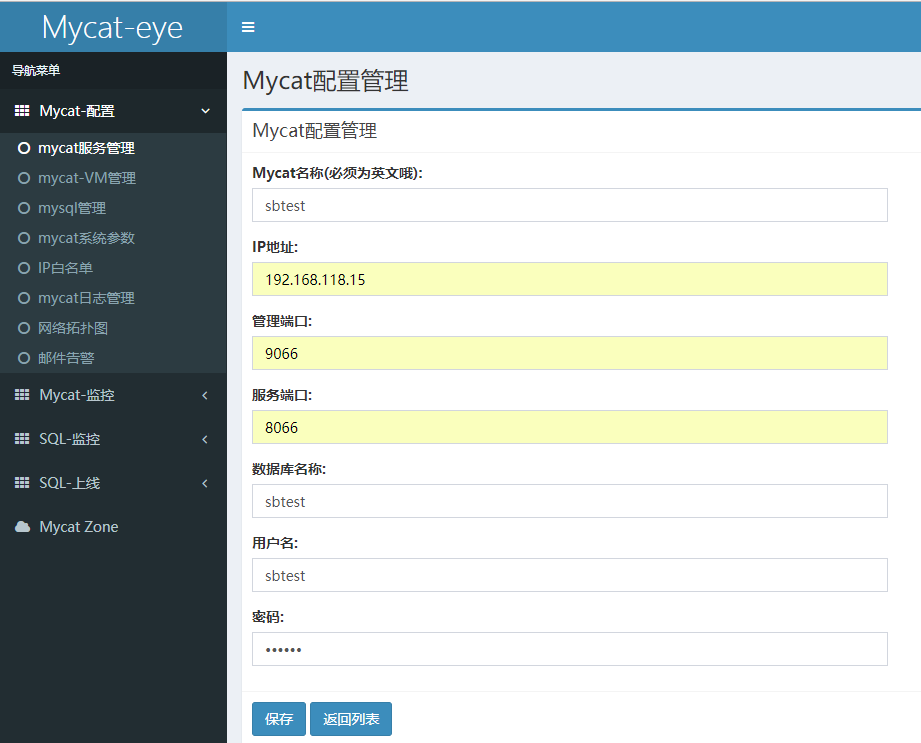
Mycat-配置 --> mycat服务配置 --> 新增
这一步注意:点击保存,如果一直在loading 状态没有反应,就是版本的问题,如果没问题会直接提示添加成功,这里是个坑。
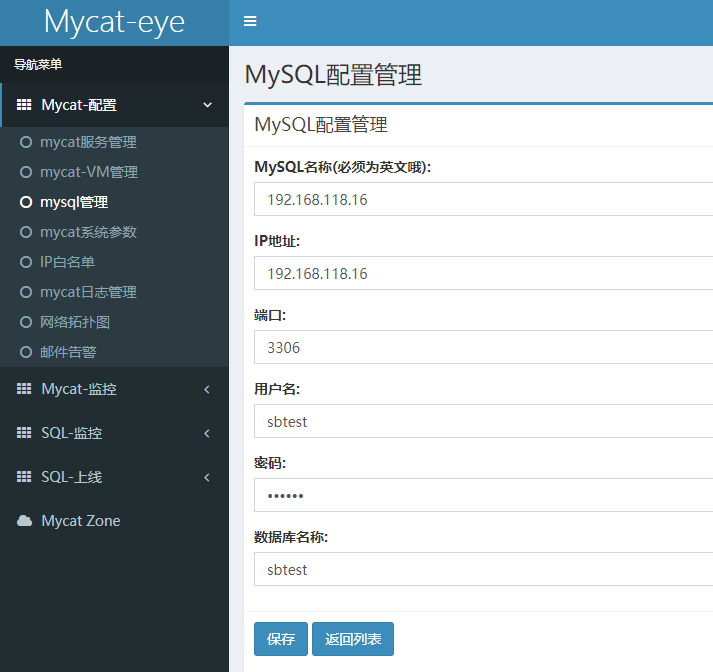
添加mysql节点的管理
Mycat配置 --> mysql管理 --> 新增
其他的监控项可以自行研究了,mycat-web获取数据真的很慢,感觉 mycat-web 是比较鸡肋的。